Cursor, the AI code editor, connects to Figma through Figma's MCP server. You install Figma's plugin in Cursor, add a rules file for your design system, paste a link to a frame and prompt the agent with your components. That gets a first version of the frame into your codebase.
Most setup guides stop there. The harder part is fitting the frame into your team's real app: keeping your components and tokens, running the app, making small tweaks and getting it reviewed.
The Figma MCP server guide covers the server itself, from seats to rate limits. If you are still choosing between a Figma file, a screenshot, a prompt or a canvas, start with the four routes from a design to a pull request.
Key takeaways
- Connecting starts with one chat command,
/add-plugin figma, and ends with a "Connect" click under Tools & MCP. The remote server is available on every Figma seat and plan (Figma Learn, Figma's MCP server guide).- A design system rules file in
.cursor/rules, set to Always Apply, tells the agent which components and tokens to use. Figma calls Code Connect "the #1 way to get consistent component reuse in code" (Cursor docs, Figma developer docs).- The first frame often looks right. At monday.com, a run that looked fine at first glance skipped the design system components and hardcoded the colors (monday.com Engineering).
- Cursor's Design Mode lets you click an element, draw on the page or describe a change in the running app, and the agent edits the code. The app has to be running in Cursor's browser, and each change is still an agent run you wait for and check (Cursor docs).
What you need before you start
You need four things before the first prompt.
- Cursor. Hobby is free with limited agent requests. Individual starts at $20 a month and includes MCPs. Teams is $40 per user a month (checked October 2026, Cursor pricing).
- A Figma seat. The remote MCP server is available on all seats and plans (Figma's MCP server guide). Tool-call limits depend on your seat and plan (Figma developer docs).
- The repo on your machine. Your team's codebase, open in Cursor, and the command that starts it. If you have never run it, ask an engineer for both.
- A frame that reads well. Figma's advice is to "Apply variables for spacing, color, radius, and typography" and to rename default layer names (Figma developer docs). It also recommends auto layout, which "usually results in cleaner, more predictable code".
Step 1: Add the Figma MCP plugin in Cursor
Figma "strongly recommends using the remote version of the Figma MCP server", and in Cursor the remote server installs as a plugin. Setup starts with one command in Cursor's chat:
/add-plugin figma
Figma's setup guide for Cursor gives the full path (Figma Learn):
- Open the command palette (Cmd + Shift + P on Mac, Ctrl + Shift + P on Windows) and choose "Open chat".
- Enter the command above, submit it and click "Add Plugin".
- Open the command palette again and go to "Cursor Settings", then "Tools & MCP".
- Under "Installed MCP Servers", click "Connect" to authenticate with your Figma account.
Figma's guide says you "should then see the Figma MCP server is enabled in Cursor and ready to use." That is your check before step 2.
The plugin adds more than the connection. It includes "Skills for implementing designs, connecting components via Code Connect, and creating design system rules" (Figma developer docs). Step 2 uses the design system rules.
You can also add the server by hand in a config file. Cursor reads .cursor/mcp.json in a project for project-specific tools, and ~/.cursor/mcp.json in your home folder for tools available everywhere (Cursor docs):
{
  "mcpServers": {
    "figma": {
      "url": "https://mcp.figma.com/mcp"
    }
  }
}
Figma also has a desktop server that can work from your current selection in Figma, not only a pasted link. The Figma MCP guide covers how the desktop server differs and what each seat allows.
Step 2: Give Cursor your design system rules
Without rules, the agent does not know your Button exists, so it may draw a new one from the frame. Cursor's page for designers says to "Create a .cursor/rules/design-system.mdc file" (Cursor). Project rules "live in .cursor/rules as .mdc files and are version-controlled", so the team reviews them like any other code (Cursor docs).
Two details catch people out. A plain .md file in that folder is ignored, and Cursor reads AGENTS.md for plain markdown instead. The rule type should be Always Apply, so the rules load in every chat rather than only when the agent judges them relevant.
Keep the file short and point at files. Cursor's advice is "Keep rules under 500 lines" and "Reference files instead of copying their contents". A design system rule needs a handful of lines:
---
description: Design system rules for all UI work
alwaysApply: true
---
- Use components from src/components/ui for all UI elements. Check that folder before creating anything.
- Never create custom buttons, inputs or modals. Use the design system.
- Colors, spacing, radius and type come from src/styles/tokens.css and the Tailwind theme.
- Never hardcode hex colors or pixel values.
- Treat Figma MCP output as a description of the design, not as final code.
- Keep diffs minimal. Do not change logic, handlers or routing.
Change the paths to match your repo. You can also have Figma draft the file. The server ships a prompt, create_design_system_rules, "for creating a rule file that provides agents with the right context to translate designs into high-quality, codebase-aware frontend code" (Figma developer docs). Read the draft with an engineer before you commit it.
Rules describe your components in words. Code Connect maps each Figma component to its code component, and Figma calls it "the #1 way to get consistent component reuse in code. Without it, the model is guessing" (Figma developer docs). If your design system team has set it up, the agent gets those mappings too. For the token side, see how Figma variables become tokens in code.
Step 3: Copy a frame link and prompt with your components
Copy the link to the frame or layer you want to build. Cursor takes the frame's ID from the link, and the agent asks the Figma server about that frame.
Start in Plan Mode. Press Shift+Tab in the chat input until Plan Mode is selected. Cursor's docs say the agent "researches your codebase, asks clarifying questions, and generates a reviewable plan you can edit before building" (Cursor docs).
This is the cheapest place to fix a wrong guess. If the plan creates a new Card and your repo already has one, say so before any code exists.
A prompt that works names the target, the components and the limits:
Implement this Figma frame: [paste the frame link]
Use components from src/components/ui and the tokens in src/styles/tokens.css.
Build it as src/app/settings/page.tsx.
If part of the frame has no matching component, ask me before creating one.
When you finish, list anything you had to guess.
Figma's docs use the same idea in one line: "generate my Figma selection using components from src/components/ui" (Figma developer docs).
Keep each prompt to one frame or one component. A whole flow in one prompt leaves the agent more to guess and gives you a bigger diff to read. And read the result as a draft. Figma's own guidance is to "Treat the Figma MCP output (React + Tailwind) as a representation of design and behavior, not as final code style" (Figma developer docs).
Step 4: Run the app and compare it with the frame
Code that compiles is not yet a screen you have seen. Start the app from Cursor's terminal with the dev command your team uses, often npm run dev. The repo's README usually names it.
Open the app in Cursor's browser. Cursor's browser docs note that "Agent is prompted to detect running development servers and use the correct ports", so the agent can look at the page it just built. Then attach a screenshot of the frame and use the example prompt from those docs:
@browser Compare current UI against this design screenshot and adjust spacing, colors, and typography to match
Check what a single frame does not show. Narrow the window to mobile width, hover the buttons, and try the page with empty and very long content. A frame rarely carries those states, so the agent may have invented them.
What designers hit after it works
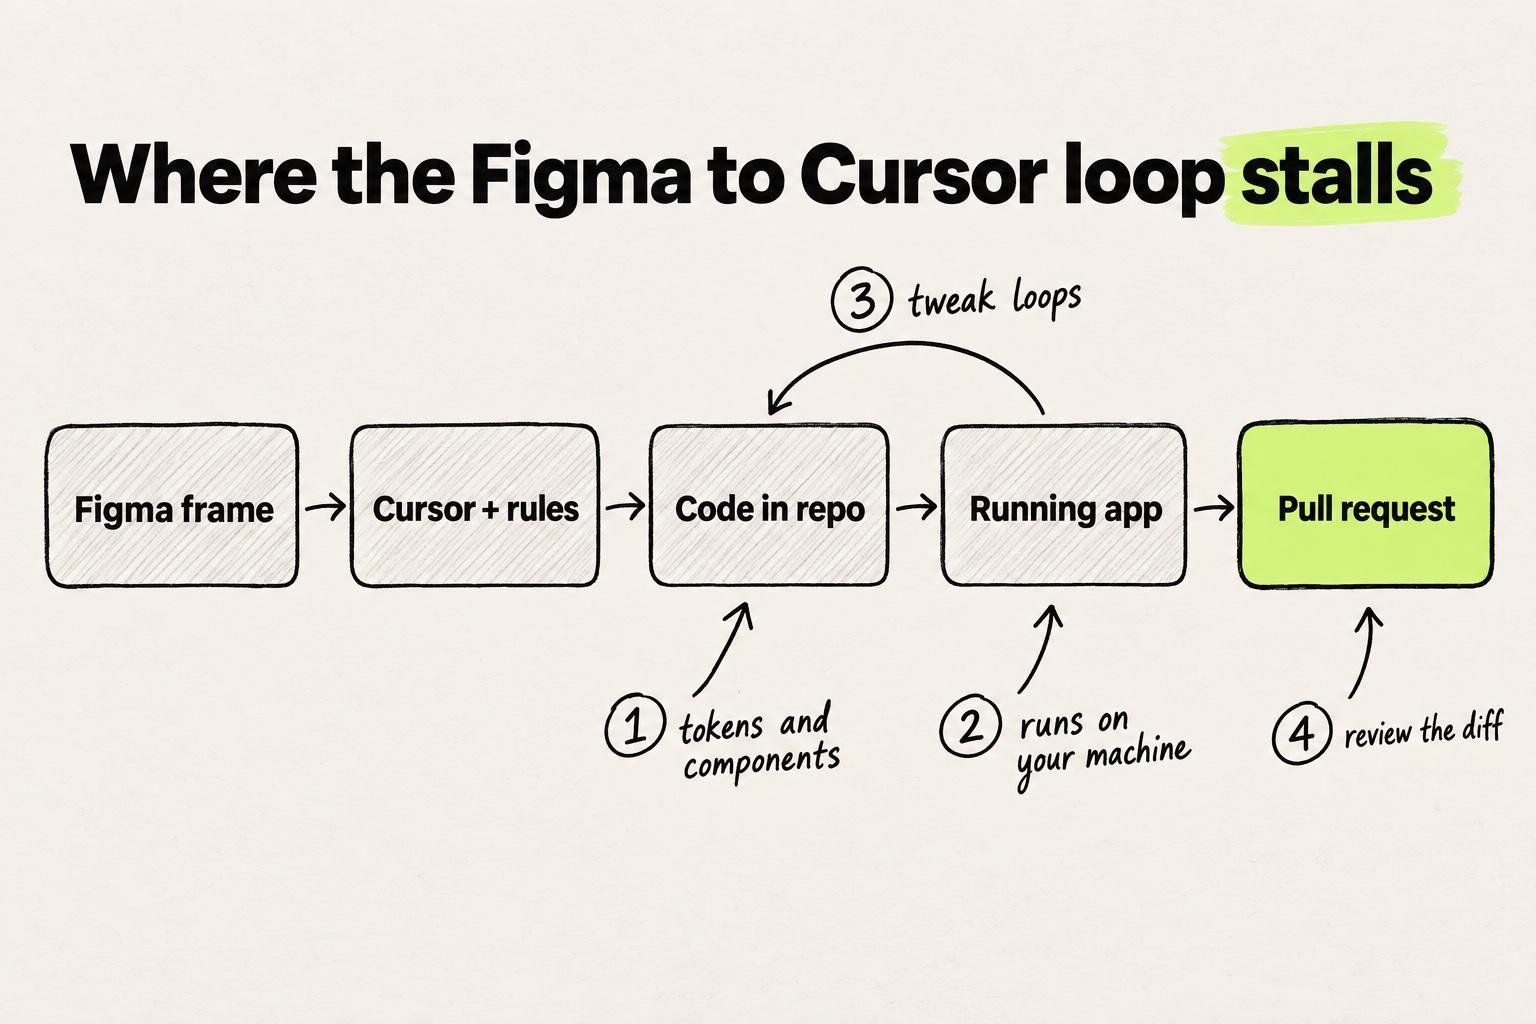
The first frame often comes out well. Phil Sayer wrote on Design Philosophy: "It had captured the colours and layout accurately, and even the button hover states!" It missed the font, which is not a free web font (Design Philosophy). Chinwike Maduabuchi got a full sign-up page on the first try and called the result "almost pixel-perfect" (LogRocket). Colin Matthews found that "The SVG icons are a little off, but could be corrected with additional prompts" (Tech for Product).
Trouble starts when that frame meets the rest of the product. We have seen designers stall at the four numbered stops in the diagram. Each has a fix, and some of the fixes need an engineer's help.
Components get recreated and values hardcoded
This is the problem that decides whether an engineer can merge the code. Rivka Ungar describes a first run on monday.com's engineering blog. "We pasted a Figma link into Cursor, let it run using the Figma MCP, and got code that looked fine at first glance."
Then they read it. "The generated output didn't use the design system components. Colors were hard‑coded. Typography overrode the system defaults." The cause was context: "It didn't know which components existed, which props were valid, which tokens had to be used". So "the developer still had to refactor the generated code into real components" (monday.com Engineering).
On the Figma Forum, one user writes that "there appears to be a lot of guesswork by the A.I. despite these components are imported from a team library" (Figma Forum). We hear the same pattern from design teams: recreated components that are not one to one with the real design system, unused tokens and hardcoded values.
The fixes are the ones from step 2, plus a habit. Keep the rules file current, set up Code Connect where you can, and ask for variables explicitly. Figma's get_variable_defs tool returns the "Variables and styles used in a selection" (Figma developer docs). Then search the diff for hex colors and arbitrary pixel values such as p-[13px]. Each one is a value to check against your tokens.
The app has to run on your machine
In this workflow you start the app yourself, from Cursor's terminal (step 4). For an engineer, that is a normal morning. For a designer, it is often where the workflow stops.
The blockers we have seen are rarely about Cursor itself:
- No access to the repository, which is common for individual designers on a product team.
- Environment variables the app needs and a designer has no way to supply.
- Logins that need company credentials before the first screen loads.
- Git itself: branches, pulls and the first merge conflict.
The fix is one session with an engineer. Ask for repo access, the settings the app needs, a test account and the command that starts it. Write the steps down, because you will need them again.
Small visual tweaks become prompt loops
The first version is close, and close is where prompting gets slow. Maduabuchi's walkthrough shows it: "notice how the corner radii that were originally on the left of the image have been moved to the right". Another fix took a prompt of its own: "I just had to prompt the agent to hide the image on mobile screens" (LogRocket).
Each of those is a prompt, a wait and a check. Designers tell us they hate to prompt for minor visual changes and would rather adjust the design directly. Some feel the agent is vague in its answers and always agrees with them. Plan Mode helps with that part, because it asks clarifying questions before it builds.
In 2025, Builder.io, which sells its own design-to-code product, wrote of the Cursor and Figma MCP workflow that "There's no way to visually iterate on the generated output" (Builder.io). Cursor has since answered part of that with Design Mode. In Cursor's browser, which sits in its Agents Window, you can "click an element, draw on the page, or describe a change by voice", and Cursor edits the code. Cmd + Shift + D toggles it, and "As agents finish, the app hot reloads" (Cursor docs).
Design Mode lets you point at what you mean. The app has to be running in Cursor's browser, and each change is still an agent run you wait for and check, even a two-pixel nudge. Tools that put design controls on the running app are compared in what to look for in a React visual editor.
| Figma MCP server in Cursor | Cursor Design Mode | |
|---|---|---|
| Starts from | A Figma frame link | An element in the running app |
| The agent gets | Design context, variables and a screenshot of the frame | The element's component, computed styles, props and a screenshot of the page |
| Best for | The first build of a new frame | Adjusting what is already built |
| Needs | The Figma MCP server connected, and a seat with tool calls left | The app running in Cursor's browser |
The diff lands on you before it reaches an engineer
Before an engineer reviews anything, you have to decide whether the change is the one you meant. Matt Abrams, in another Builder.io post, suggests asking the agent first: "Summarize this diff and call out any risky changes (logic, handlers, routing, forms, state) before I accept." He puts three constraints in the prompt as well: "Keep logic intact." "Minimal diff only." "Reuse existing components and tokens."
A product designer told us what they check in a change. Was it as small as expected, say two lines? Is it in the right file? Did it change one screen, or every screen that uses the component?
A padding fix inside a shared Button changes every page with a Button, which may or may not be what you want. If you have not opened a pull request before, the walkthrough of a designer's first pull request goes from branch to merge.
When Cursor fits, and when it does not
Cursor with the Figma MCP is one of the stacks designers describe to us most often. It fits when you can open the repo, the app runs on your machine, and an engineer has helped set up the rules file. Plan Mode, the browser and Design Mode then cover most of the loop in one tool. We hear that designers who have adapted to these tools produce much more than those who have not. We also hear that many adapt slowly, because the tools are hard to use.
It fits less well in three cases. You cannot get the app running locally, because of access, settings or logins. Most of your work is small visual adjustments, and waiting on an agent run for each one wears you down. Or you want to stay in Figma and hand the build to an engineer. That route, and why teams move away from it, is in how the Figma to code workflow is changing.
If you prefer the terminal, Claude Code reads the same Figma server, covered in the Claude Code version of this workflow. The design engineer's tool stack shows where each tool fits.
Modeinspect is one option when running the app locally is the blocker. It runs your codebase in a private cloud environment, so there is no local setup. You can paste a Figma frame onto the canvas, have the agent build it into the app, refine it with design controls and open a pull request that engineers review. The codebase has to be connected once. How Modeinspect and Cursor compare for designers covers the trade-offs.
Frequently asked questions
Do I need a paid Figma seat to use Figma with Cursor?
No. Figma's remote MCP server is available on all seats and plans, including the free Starter plan. How many tool calls you get depends on the seat and plan. A Dev or Full seat on a paid plan gets far more than a View or Collab seat (Figma developer docs).
Does Cursor follow my design system?
Only as far as you tell it to. Without a rules file or Code Connect, the agent often recreates components and hardcodes colors and spacing. A .cursor/rules/design-system.mdc file set to Always Apply gives the agent your component folder and tokens. Code Connect maps Figma components to code components directly (Figma developer docs).
How much does Cursor cost for the Figma workflow?
Cursor's Hobby plan is free with limited agent requests. Individual starts at $20 a month and lists MCPs among what it includes. Teams costs $40 per user a month (Cursor pricing). The Figma side is separate and depends on your Figma seat and plan.
Is Cursor's Design Mode the same as the Figma MCP?
No. The Figma MCP server brings a Figma frame into Cursor's agent as design context. Design Mode works on the app already running in Cursor's browser, where you click, draw or speak a change. You can use the MCP for the first build and Design Mode for adjustments.