A good first pull request as a designer is one small visual change, made on a branch, with before and after screenshots and a preview link in its description. One engineer reviews it, and that engineer agreed to review it before you started. The change is copy or pure UI, with no logic.
More designers are opening that first one. In repositories connected to Linear, the share of designers attaching pull requests has grown several times over since mid-2024 (Linear).
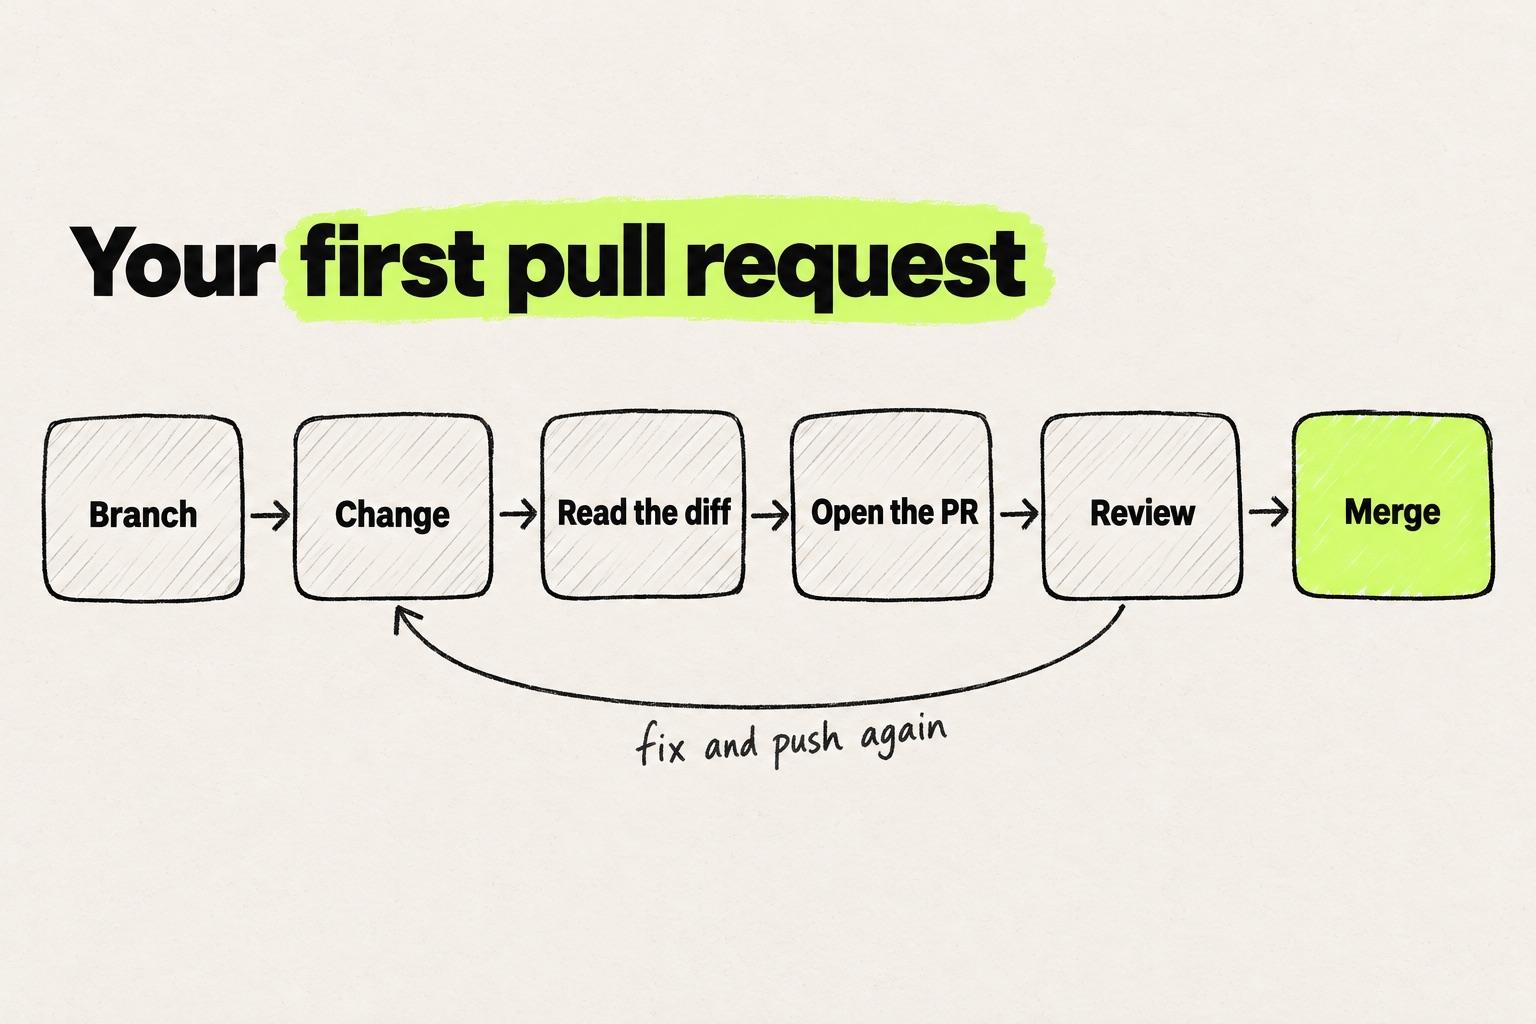
This chapter of the guide to becoming a design engineer walks through it in eight steps. Each step ends with what you should have in hand. Steps 1 to 3 happen before any code changes, and steps 4 to 8 follow the loop below.
Step 1: Get write access and one reviewer who said yes
Two things must exist before you change anything: permission to push a branch, and a person who has agreed to read it.
Start with access. You need the Write role, which GitHub's repository roles recommend for "contributors who actively push to your project." It lets you push a branch and request a review. Ask whoever administers the repository, usually an engineering manager.
Then find the reviewer. Anton Zaides, an engineering manager, described the default on his team in his Manager.dev newsletter. "A designer would drop the PR in a Slack channel, hoping someone would pick it up. Mostly, they didn't, and the PRs stayed open and forgotten." His fix: "My current bet is on pairing each non-dev with a dev who'll be responsible for it."
So ask one engineer by name, before you start, and tell them what you plan to change. A good candidate is whoever last edited the file you will touch. GitHub's suggested reviewers "are based on git blame data" for the same reason.
What you have at the end: Write access, and one engineer who has said yes.
Step 2: Pick a change small enough to review
The right first change fits in one sentence that starts with a verb. "Increase the space above the hero subtitle." "Use the muted text token on the pricing footnote." "Add the missing hover state to the secondary button." If the sentence needs an "and", it is two pull requests.
Zaides's list of what non-developers on his team should touch is short: "Copy changes, Pure UI changes that don't change any logic, Prompt changes." Eduardo Sonnino, a principal designer for AI at Atlassian, sets similar limits in his post Designers' workflow for shipping code. He keeps business logic, fragile performance, shared platform libraries and security work out of it.
One engineering team we worked with during a pilot added two rules of its own. Designers do not edit a shared component's source, and a new page is a red flag.
Google's engineering practices call a pull request a changelist, or CL. Their page on small CLs sets a size rule. "100 lines is usually a reasonable size for a CL, and 1000 lines is usually too large, but it's up to the judgment of your reviewer." A first designer pull request can be one to ten lines. Reviewers put off big AI-generated pull requests, as the data on how teams ship front-end changes faster with AI shows.
What you have at the end: one sentence that describes the change, with a verb first and no "and".
Step 3: Find where the change lives
Start from what you can see on screen, and search the repository for it. Three searches cover most first changes.
- Visible text. The exact words of a button label or heading lead to the component or page that renders them.
- A component name. A name from Storybook or an engineer's tour leads to the file that defines it.
- A token. A token name leads to the theme file, and to every place that uses it.
On modeinspect.com, the subtitle under the homepage headline lives in components/home/hero.tsx. Its muted gray is colors.fgMuted, and searching for fgMuted leads to components/home/tokens.ts, where the value is defined. These are the first three concepts in what a design engineer needs to learn, put to work.
Two things can go wrong. The text can turn up in more than one file. Search for that subtitle and hero-legacy.tsx comes back next to hero.tsx. It is a backup of the previous homepage design, and only hero.tsx renders on the live homepage. Or the text turns up nowhere, because it comes from a CMS or a database, and then it is not a code change. Either way, ask your reviewer before you edit.
What you have at the end: a file path, plus the component or token you will touch.
Step 4: Make the change on a branch
Every route starts with a new branch named after the change, never the main branch. Sonnino's example, designer-glow-gradient-polish, tells a reviewer what to expect before they open anything.
| Route | Fits | Where you see the result |
|---|---|---|
| github.dev in the browser | A one-line copy or token change | On the preview deployment, once the pull request exists |
| A coding agent (Cursor, Claude Code) | A small UI change over a few lines | Locally, once the app runs on your machine |
| A canvas on the codebase (Modeinspect) | A visual change you want to judge by eye | On the canvas and a live preview link |
github.dev for a one-line change
Press . on the repository page in GitHub and github.dev opens the code in your browser. Edit the file, commit it to a new branch, and create the pull request without installing anything. The docs name the limit: "There is no associated compute, so you won't be able to build and run your code or use an integrated terminal." If your team has no preview deployments, keep this route for copy changes.
A coding agent for a small UI change
Cursor and Claude Code work on a copy of the repository on your machine, which needs a one-time setup, often with an engineer. Prompt them with the names from step 3, and say what must stay the same.
In components/home/hero.tsx, change the space above the lead paragraph from mt-8 to mt-10.
Keep colors.fgMuted as the text color. Do not change any other class.
The last two sentences carry the weight. They name what must not change, which is exactly what step 5 checks.
A canvas on the codebase for a visual change
Modeinspect runs your product from the connected codebase in a private cloud environment. You adjust layout and style on a canvas built from the real components and tokens, and check the result on a live preview link. Its Create PR step opens a branch and a GitHub pull request whose description carries the change summary and the preview link. Engineers review and merge it like any other pull request. It works with Next.js React codebases that use Tailwind.
The design engineer tools chapter compares these routes and where each one stops.
What you have at the end: a branch with your change committed on it.
Step 5: Read your own diff
Read the diff before anyone else does. The preview shows how the change looks. The diff shows what it did to the code, and the two can disagree.
On GitHub, the Files changed tab "shows the diff that reviewers use to understand the proposed changes." Lines that start with - were removed. Lines that start with + were added.
Here is a real one-line change to the homepage subtitle, from the repository behind modeinspect.com.
- <p className={cn(typography.lead, "mt-8 max-w-[46ch]")} style={{ color: colors.fgMuted }}>
+ <p className={cn(typography.lead, "mt-8 max-w-[46ch] text-[#0000009e]")}>
The removed line colors the text with colors.fgMuted, a design token. It is defined in components/home/tokens.ts as rgba(17, 17, 16, 0.62). The same file defines a second fgMuted, rgba(250,248,246,0.62), for the dark surface set. The name means "muted text" across the system, and the team changes it in one place.
The added line drops the token and hardcodes #0000009e, which is black at about 62% opacity. On the light hero it looks the same. Only the diff shows that the token is gone, and that the next change to fgMuted will skip this paragraph.
The pull request was closed without merging.
The second pattern is a line you never asked to change. During one pilot, we saw a color edit on a heading also remove the class next to it, text-display-sm. The color was right, and the heading was the wrong size.
One principal designer we interviewed wants to see the diff "not to check code, but to check agent output accuracy". Did the card change on one screen, or everywhere?
| In the diff | What it means | What to do |
|---|---|---|
| A token name replaced by a hex, rgba or pixel value | The change left the design system | Ask for the token back, by name |
| A class or prop removed that you did not mention | A collateral change | Restore it, and add "do not change any other class" to the prompt |
| A file you did not expect | The change reaches other screens | Check those screens, or narrow the change |
| Far more lines than your one-sentence change needs | Scope creep | Split it (see "A pull request that grew too big" below) |
What you have at the end: a diff you can explain line by line.
Step 6: Open the pull request
On GitHub, select your branch and click "Compare & pull request" in the yellow banner. The base branch is where the change will merge, usually main, and the compare branch is yours. From a terminal or a coding agent, gh pr create does the same. GitHub's guide to creating a pull request covers both.
If your route has its own Create PR step, the pull request already exists. Edit its title and description on GitHub to follow the rules below.
Write the title as an order
Google's guide to CL descriptions asks for a first line that is "a complete sentence, written as though it was an order". Its example of a bad one is "Fix bug". "Increase the space above the hero subtitle to mt-10" tells a reviewer the whole change before they open it.
Paste a description template
Copy this into the description and fill every section. GitLab's merge request guidelines make the screenshots a rule: "The MR must include 'Before' and 'After' screenshots if UI changes are made." On GitHub, drag the images into the description or paste them.
## What changed
Increase the space above the hero subtitle from mt-8 to mt-10.

## Why
The subtitle sits too close to the headline at desktop widths.
This matches the spacing in the approved design.

## Before and after
| Before | After |
| --- | --- |
| (drop screenshot) | (drop screenshot) |

## States covered
- Desktop (1440px), tablet (768px), mobile (375px)

## Preview
(paste the preview link)

## What to check
- Only hero.tsx changed.
- The text color still uses colors.fgMuted.

Closes #123
The preview link often writes itself. On Vercel, "Each deployment gets an automatically generated URL, and you'll typically see links appear in your Git provider's PR comments." Netlify builds a Deploy Preview for each pull request. Open it yourself before you ask anyone else to.
Sonnino's "Done means" list ends on the standard to write for: "Engineers can safely review and merge without guessing design intent."
Open it as a draft, then request the review
If you open the pull request on GitHub yourself, "Create Draft Pull Request" lets you see the preview and the checks first. "Draft pull requests cannot be merged, and code owners are not automatically requested to review them," GitHub's docs explain. When it looks right, click "Ready for review" in the merge box. Then, under Reviewers, request your agreed reviewer and send them the link.
What you have at the end: an open pull request with an order for a title, the template filled in, screenshots, a working preview link, and one requested reviewer.
Step 7: Get through the review
A review ends in one of three states. GitHub's docs on pull request reviews define them.
| Review | GitHub's definition | What you do |
|---|---|---|
| Comment | "Leaves general feedback without explicitly approving or requesting changes." | Reply, and change what you agree with |
| Approve | "Signals that the changes are ready to merge." | Go to step 8 |
| Request changes | "Flags feedback that the author should address before merging." | Fix, push, and re-request the review |
Google's standard of code review asks reviewers to prefix optional points with "Nit:". That tells the author "it's just a point of polish that they could choose to ignore."
When a reviewer writes the fix for you as a suggested change, click "Commit suggestion" under it. After any other fixes, re-request the review with the sync icon next to the reviewer's name in the Reviewers sidebar. GitHub's page on incorporating feedback covers both.
Google's guideline on review speed says "One business day is the maximum time it should take to respond to a code review request". Software Engineering at Google adds that "Most code reviews at Google are reviewed by precisely one reviewer," and that most changes "are expected to be reviewed within about a day." A day of silence calls for a friendly nudge, not a second reviewer.
Guillaume Fiette, an engineer at Prelude, names the history engineers bring in Prelude's case study: "I was skeptical going in, everyone's seen AI slop end up in a codebase." In the same quote, he credits Modeinspect with respecting the team's conventions and design tokens, which is what step 5 checks.
What you have at the end: an approved pull request.
Step 8: Merge, then check production
Ask your reviewer who clicks merge. On some teams the author merges after approval. On others the engineer does. If the repository requires status checks, they "must pass before the pull request can be merged."
Then check the real product. Wait for the deploy, open the live page, and look at the change at every width you listed under "States covered". If the description said Closes #123, GitHub closes that issue when the pull request merges into the default branch.
Before the next change, go back to an up-to-date main branch. A teammate of ours who was new to git kept working after a first merge and could not tell where the new changes went. The workspace was still on the merged branch. Every new change needs a new branch, cut from the latest main.
What you have at the end: your change live in the product, and a screenshot of it for the ticket.
When your first pull request goes wrong
Something will break the first time, and that is part of the job. Mehmet Baytaş, previously a design engineer on Attio's marketing team, framed it this way in his Hatch Conference 2026 keynote. He said he starts each workday expecting nothing to work. In a line he borrowed, technology is everything that does not work yet. Making it work is the job.
A red check on your first pull request is the same event at a smaller scale. Three failures are common enough to plan for.
A red check or a merge conflict
A red cross next to a check means an automated test, build or rule failed, and the Checks tab shows which one. Open it, copy the error, and give it to your agent with the file name. If the error means nothing to you, send it to your reviewer. Do not ask anyone to switch the check off.
A merge conflict means someone changed the same lines on main after you branched. Chapter 4's rule holds: hand it to the engineer.
A broken preview
A preview that fails to build usually fails for the same reason as a red check. One that builds but shows a blank page may lack a setting only the preview environment needs, which your change did not cause. Either way, post the link and a screenshot in the pull request and ask.
A pull request that grew too big
Zaides's team learned this one at scale: "The result was a 10k-line PR from our designer that was a complete mess." It mixed copy tweaks and CSS changes with a new feature that needed backend work. The agent had mocked the backend, and the designer did not see why that was a problem.
The fix is to split. Close the big pull request, start a new branch from main, and bring over the smallest piece that stands on its own. Open that one first.
What changes after the first merge
Once you design in code, the design QA list changes. The spacing drift, the missing hover state and the hardcoded color you used to file as tickets are each a step 2 change now. The design QA checklist is a ready source of them.
The first merge also turns your reviewer into a working partner. Zaides put the engineering side of that plainly. "Giving our designers the ability to take care of the smaller things themselves is very freeing (assuming they know where to put the boundary…)." The boundary is step 2, and it holds for the tenth pull request as much as the first.
The next chapter turns the direction around: design QA in code, reviewing an engineer's pull request as a designer and fixing the drift you find in it.