A Figma frame shows what a page looks like. It does not say which URL the page lives at or which parts run in the browser. It does not say where the header and footer come from, how images and fonts load, or what the browser tab says. An engineer will ask about each of them in review.
The good news for anyone going from Figma to Next.js: your app has already answered most of them. The layout draws the header and footer. The root layout loads the fonts. Every other page shows how images and titles are done. That leaves you two real decisions: the page's address, and what changes when people click.
This guide takes a design to Next.js in five steps. Each one says what to decide, what to prepare in Figma and what to check, so you can brief an engineer or a coding agent and review what comes back. You do not need to write the code. Spacing, colors and classes are covered in turning Figma styles into Tailwind classes. To compare this with screenshots, prompts and a canvas, see the four routes from design to code.
Key takeaways
- Taking a Figma design to Next.js is mostly reusing decisions your app already made: the layout, the fonts, how images load and how pages set their title.
- Two decisions are yours: the URL the page lives at, and which parts change on the page when people click or type. Mark those in the frame and leave the rest static.
- A converter, the Figma MCP server or an engineer can draft the page. Check the draft against the app before review, because the frame knows how the page looks, not where it lands.
What a Figma frame leaves out
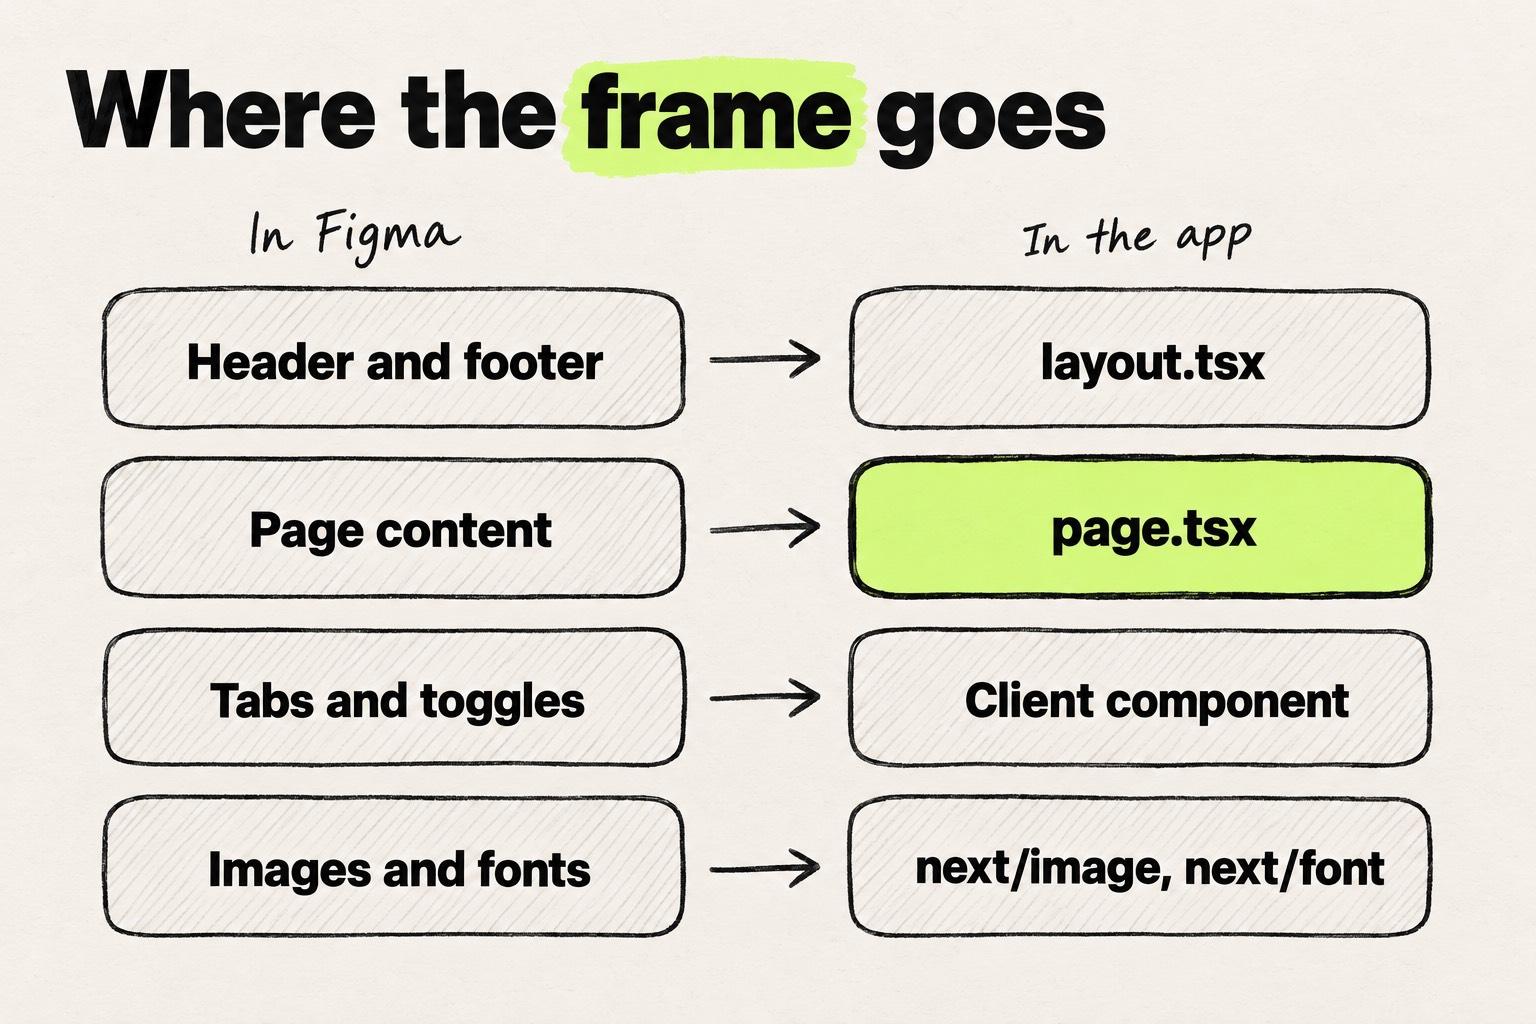
Next.js turns each part of your frame into a file or a setting. You do not need to write those files to make good calls about them. The table shows where each part goes and whether the app has already decided it.
| In your Figma file | What it becomes in Next.js | Already decided? |
|---|---|---|
| The frame | A page at its own URL, such as /pricing | No, you pick it |
| Header and footer on every frame | A shared layout every page uses | Yes, by the layout |
| Tabs, menus, toggles and forms that react as you type | Parts that run in the visitor's browser | No, you mark them |
| Images, icons and logos | Images Next.js resizes for each screen | Yes, by the project's image setup |
| Font families in the text styles | Fonts loaded once for the whole app | Yes, by the root layout |
| The frame's name and purpose | The title in the browser tab and in search results | The pattern, yes. The words are yours. |
Step 1: Pick the page's address
In Next.js, the folder a page sits in is its URL. A page is a file called page.tsx, so a pricing page in app/pricing/page.tsx shows up at /pricing.
app/
  layout.tsx
  (marketing)/
    layout.tsx
    pricing/
      page.tsx
      plan-toggle.tsx
      pricing-hero.tsx
Folders in parentheses group pages "by site section, intent, or team" without changing the URL, so this tree still serves /pricing. The layout.tsx files above the page draw what every page in that group shares. Next.js describes layouts as the place "for shared UI such as header, nav, or footer". Your header and footer are already there, so nobody should rebuild them from your frame.
In Figma: name the frame after its URL, such as "Pricing, /pricing". Say which section it belongs to, and mark the header and footer as the existing ones.
Step 2: Mark what changes when people click
If you are the one designer on a Next.js team with ten or more engineers, the push to "use AI" has probably reached you. You may already have pointed the Figma MCP server at a frame and got one React and Tailwind component back. That is what it returns unless the prompt says otherwise (Figma developer docs). Nothing in that file says which parts run in the browser, and the engineer who reviews it will ask.
Next.js builds most of a page on the server, so the visitor's browser gets the finished result and none of the code that built it. Pages work this way by default. Only the parts that change on the page when people click or type need code in the browser. That means a monthly and yearly toggle, tabs, a menu, or a form that checks input as you type. Links and buttons that go to another page do not. In the Next.js docs' own example, a layout with a logo, nav links and a search bar sends only the search bar's code to the browser. In code, each of those files starts with one line, "use client".
That line has a cost. Everything the file pulls in ships to every visitor's browser, so the fewer parts that need it, the faster the page. As Lee Robinson of Vercel puts it, "You don't need to add "use client" to every file".
In Figma: annotate each part that changes on the page when people click or type, and what it does. Links to other pages need no note. On a pricing page, that might be one toggle.
Step 3: Export images the way Next.js uses them
Export logos and icons as SVG, which Figma recommends for "logos, icons, or illustrations". Export photos as JPG at 2x, so there is a sharp source to shrink for smaller screens. Next.js does the shrinking: its image component serves the right size for each screen and loads images only as they scroll into view.
Three things only you know. The first is which image is the hero, the first thing people see, so it loads right away instead of waiting its turn. The second is what each image shows, written as alt text, or a note that it is decoration. The third is how wide each image shows at each width you drew. Without that, the browser assumes an image is "as wide as the viewport" and may download a bigger file than the page needs (Next.js docs).
If you use the Figma MCP server on your desktop, pick the option that downloads images into the project. Its localhost image links only work on your machine.
In Figma: export SVG for vectors and 2x JPG for photos, name the files, flag the hero, and write the alt text and the shown width next to each image.
Step 4: Check the fonts the app already loads
Most apps load fonts once, in the root layout, and every page inherits them. In an app that already ships, this step is usually done before your frame arrives. Compare the font families in your Figma text styles with the ones the app uses. If they match, there is nothing to do.
A new font has to be added by someone. A Google Font is one import, and Next.js serves it with the app, so "No requests are sent to Google by the browser" (Next.js docs). A paid font needs its files and a license for the web first. Designer Phil Sayer sent a frame set in Rotis through the Figma MCP server and Cursor. His write-up: "It hadn't captured the font or font weights likely because the rotis font isn't available as a free web font".
In Figma: design with the app's fonts, or check the license before you bring in a new one.
Step 5: Give the page a title and check it in the browser
Every page has a title and a description, shown in the browser tab and in search results. Next.js calls this metadata, and the page file sets it. If the other pages already set theirs, the new page copies the pattern. This is the whole page file for the pricing example, with the title, the hero and the toggle:
// app/(marketing)/pricing/page.tsx
import type { Metadata } from "next"
import { PlanToggle } from "./plan-toggle"
import { PricingHero } from "./pricing-hero"

export const metadata: Metadata = { title: "Pricing", description: "Plans for every team size." }

export default function PricingPage() {
  return <main><h1>Pricing</h1><PricingHero /><PlanToggle /></main>
}
Then open the page and compare it with the frame at every width you drew. An engineer can run the app on their machine with a command such as npm run dev, or you can open the preview link if your team has one. The full pass is checking a build against the design.
In Figma: write the page title and a one-line description on the frame.
What is left after these five steps, when you take a design to Next.js, is styling: spacing, color and type sizes. Those are Tailwind classes, not page structure.
Where the page lands matters more than which tool drafts it
The Figma MCP server does not write Next.js on its own. "By default, the output is React + Tailwind, but you can customize it through your prompt" (Figma developer docs). So give your coding agent a rules file, a short set of instructions it reads every time. Tell it that pages go in app/, only marked parts run in the browser, images use next/image and fonts come from the root layout. Setup is in the Figma MCP server guide, and the rules file in the Figma and Cursor workflow.
Converter tools handle Next.js differently:
- Locofy supports "both the Next.js App Router and Pages Router" (Locofy docs).
- Kombai lists Next.js 14, 15 and 16, with either router (Kombai docs).
- Anima supports "React, Vue, and HTML", with no Next.js option (Anima).
- Builder Code, formerly Fusion (Builder.io), works with either router (Builder.io).
For the component side, see turning Figma components into React.
Modeinspect starts from the running app. Its canvas shows live pages of your Next.js React codebase that uses Tailwind (Next.js 15 or newer). Paste a Figma frame, drop it onto one of those pages, and the coding agent builds it into the app's own files. The page picks up the layout, the fonts the root layout loads and the image setup the codebase already has, and the change leaves as a pull request.
Without an app yet, start a new project on a blank canvas instead. It comes with a Next.js starter codebase, so the pasted frame is built into Next.js code from the first step. When the project is ready, publish it to a new GitHub repository on your personal account, and changes after that reach the repository as a pull request.
Either way, fonts are not imported from Figma, component instances arrive as plain layers, and Figma variables do not become tokens. The font and title rows, and the tokens, are still yours to check.
Open the pull request and check it against the six rows in the first table.
Frequently asked questions
Do I need to know code to turn a Figma design into a Next.js page?
No. The decisions in this guide are design decisions: the URL, what changes when people click, which images and fonts, and the page title. An engineer or a coding agent writes the files. Knowing where each part goes lets you brief them well and check what comes back.
Can Figma export Next.js code directly?
No. Dev Mode snippets can be customized for Tailwind or React (Figma Help Center), and the MCP server returns React and Tailwind or what you prompt for. Converter tools such as Locofy and Kombai generate Next.js code.
How do I start a new Next.js project from a Figma design?
Create the app first, then build the frame into it. The usual start is npx create-next-app@latest, which sets up the App Router (Next.js docs). The frame then becomes a page.tsx file under app/, with images through next/image and fonts through next/font. In Modeinspect, a new project starts from a Next.js starter codebase. Paste the Figma frame, let the coding agent build it, and publish the project to a new GitHub repository on your personal account.
Should the page use the App Router or the Pages Router?
The App Router, the newer of Next.js's two ways to organize pages, and the one this guide uses. The Next.js 16 project template "includes the App Router by default" (Next.js). If your app already uses the Pages Router, follow the app. Locofy and Kombai support both.
Does every part of the Figma frame need "use client"?
No. Only parts that change on the page when people click or type need it: a toggle, tabs, a menu, a form that checks input as you type. Links to other pages do not. Everything those parts pull in ships to the browser with them, so keep them small (Next.js docs).